1- Ubuntu 12.04 can't restart
Issue
Ubuntu
12.04 can't restart following the standard reboot procedure:
Click system button in upper right corner > Shut down... > Restart button
It
ends up in a black screen.
Solution
The
reason for the problem could be a BIOS issue or the hardware setup of
the system
1)
Enter the command in the terminal
sudo gedit /etc/default/grub
2)
Find GRUB_CMDLINE_LINUX="" and
change it to GRUB_CMDLINE_LINUX=”reboot=
3)
Save the file and run the command:
sudo update-grub
If
this is not working, try with some other parameter instead
of efi (i.e.: reboot=efi).
For detailed list of available parameters read...
Ubuntu Netbook Restart Problem
Many
Linux users that have netbooks have been complaining about restart
issue. I didn't pay attention to the complaints until I bought Acer
Aspire One D257 netbook
Namely,
the netbook running Ubuntu 11.10 and Ubuntu 12.04 failed to reboot,
it ended up in a black screen and can only shutdown. What was very
strange the issue existed only on regular restart procedure: System
button in upper right corner > Shut down... > Restart button.
If restart was peformed after system udpate it could reboot properly.
The
reason for the problem could be a BIOS issue or the hardware setup of
the system. For example some netbooks with Atom processor doesn't
come with a keyboard controller in which case Linux kernel can't
figure out the way to tackle that situation.
If
you have simillar problem with your netbook failing to reboot, here
is the way to solve it:
1) Open terminal
1) Open terminal
2)
Type:
sudo gedit /etc/default/grub
3)
Find GRUB_CMDLINE_LINUX="" and
change it to GRUB_CMDLINE_LINUX=”reboot=
4)
Save changes and close gedit
5)
Update the grub with the following command:
sudo update-grub
6)
Power off your machine and then switch it on again. Once it is
booted, try to restart it to see whether it is working. If this is
not working, try following commands instead of efi (i.e.:
reboot=efi).
warm =
Don’t set the cold reboot flagcold =
Set the cold reboot flagbios =
Reboot by jumping through the BIOS (only for X86_32)smp =
Reboot by executing reset on BSP or other CPU (only for
X86_32)triple =
Force a triple fault (init)kbd =
Use the keyboard controller. cold reset (default)acpi =
Use the RESET_REG in the FADTefi =
Use efi reset_system runtime servicepci =
Use the so-called “PCI reset register”, CF9force =
Avoid anything that could hang.
Depending
on netbook's manufacturer and model, bios, acpi, pci, efi seems to be
probable solutions.
Here
are some solutions for a couple of netbook models:
- Acer Aspire One D257 netbook - efi will fix the issue
- Acer Aspire One Happy 2 netbook - acpi will fix the issue
2-There is no "Show Desktop" option
Issue
By
default, Ubuntu 12.04 doesn't have enabled options to show desktop
except using shortcut keysCtrl+Super+D(the
Super button is the Windows button in the most cases)
Solution
Show
Desktop in Ubuntu 12.04 via CompizConfig Settings Manager (the first
way)
1)
Install and run CompizConfig
Settings Manager
2)
Click on Desktop category on left sidebar > Click on Ubuntu
Unity Plugin > Select
theExperimental tab
3)
Mark option Show "Desktop Icon" in the launcher
The
desktop icon will appear in the Unity launcher and you can click on
it in order to show desktop.
3-Unity launcher auto hide problem
Issue
Many
users compain that after enabling
Unity Launcher auto hide,
it doesn't show when cursor is moved to the left edge of the screen
in Ubuntu 12.04.
Solution
The
trick here is not how hard the mouse cursor is moved to the left
screen edge but how far (or fast). Here are the steps that could help
you in using the launcher in the way you like:
1)
Install CompizConfig Settings Manager (known by its shortname CCSM)
2)
After the installation, start CompizConfig Settings Manager
3)
Go to Desktop > Ubuntu Unity Plugin > Experimental tab
4)
Find the option "Launcher
Reveal Pressure"
5)
Default value is 20, but you can change it to any lower
4-Hibernate option missing
Issue
Ubuntu
12.04 doesn't have enabled hibernate feature by default, but you can
enable it if your hardware.
Solution
1)
Create file
/etc/polkit-1/localauthority/50-local.d/com.ubuntu.desktop. pkla
2)
Add the content:
[Re-enable hibernate by default]
Identity=unix-user:*
Action=org.freedesktop.upower.hibernate
ResultActive=yes
3)
Save the file, restart the machine and new menu item should appear
under the system button in upper right corner
5-"Ubuntu 12.04 has experienced an internal error" message
Issue
Ubuntu
12.04 contains error reporting system named Apport that can send
error information to Ubuntu center in case that something goes wrong
on your system. There could be many reported issues caused with
various reasons displaying the message error:
"Sorry, Ubuntu 12.04 has experienced an internal error"
Solution
The
only solution to stop displaying error messages is to disable the
Apport, the error reporting system:
1)
Run the command
sudo gedit /etc/default/apport
2)
Change the value of the "enabled"
parameter from "1"
to "0"
and save the changes
6-Unity Launcher Hiding Behind Other Windows
Issue
In
some cases, Unity Launcher goes in the background, behind all windows
and the Unity Shell, and it's not possible to move it to the
frontend, in front all other windows (what is its default and normal
behavior). This happens no matter whether you enabled Unity Launcher
auto hide option or not. Usualy, GIMP causes this annoying Unity
Launcher's behavior.
Solution
Sometime,
after some further use and without any additional actions, the
computer could freeze for a brief moment and Unity Launcher and Dash
could continue to work properly. If this doesn't happen here is the
way to restart unity launcher without destroying the session and
avoiding computer restarting:
1)
Start terminal and run the following command:
sudo unity&disown
Screen
will flick a few times and after that everything will be back again.
7-Can't change Ubuntu 12.04 default font
Issue
There
is no configuration option for changing default font type and size in
Ubuntu 12.04
Solution
1)
Instal gnome tweak tool:
sudo apt-get install gnome-tweak-tool
2)
Start gnome tweak tool either by click on Dash Home and entering
"advanced settings" or typing command "gnome-tweak-tool"
in the terminal
3)
GNOME Tweak Tool window will appear
4)
Select the Fonts section on the left
5)
Choose your preferent default font, document, monospace and window
title font as well as font size and hinting and antialiasing types.
8-Wireless connection doesn't remember password
Issue
Wireless
connecton continue asking for password in window "Wireless
Connection Authentication Required" every time the computer is
started.
Solution
1)
Click on the connection icon on the taskbar
2)
Select the last menu item "Edit
Connections..."
> Click on the Wireless tab
3)
Select you connection and click the Edit button
4)
Check "Connect
automatically"
checkbox on new window and click "Wireless
Security"
tab
5)
Select the connection's Security (usually it is "WEP 40/128-bit
Key (Hex or ASCII)")
6)
Enter your password in the Key field (you can check the "Show
key" checkbox if you want to see what password you entered) and
click "Save..."
button
9-GEdit is too slow
Issue
GEdit
text editor is very slow in Ubuntu 12.04 Precise Pangolin
Solution
The
solution is to disable File Browser plugin in GEdit.
Start GEdit and select Edit > Preferences > Choose Plugins tab > Deselect File Browser Panel plugin
10-Ubuntu 12.04 with low RAM is very slow
Issue
Ubuntu
12.04 Precise Pangolin could become sluggish and slow on a machine
with low memory. In this case Ubuntu accesses the hard disk often and
it will impact the performance very much.
Solution
Change
swappines value. The lower the value is, the longer it takes before
Ubuntu starts using the swap partition instead phisical memory. More
about Linux swappiness read HERE.
1) Run terminal
2) Enter the command to check out current swappines value
cat /proc/sys/vm/swappiness
3) The result will probably be 60 (default value in Ubuntu for swappiness)
4) Open file /etc/sysctl.conf in a text editor, e.g.
gedit /etc/sysctl.conf
5) Go to the end of the file and enter the following parameter
# Decrease swappiness value
vm.swappiness=10
6) Save the file and restart the computer
11-"Hot Corner" show desktop doesn't work after restart
Issue
Our
article describes how
to show desktop in Ubuntu 12.04 by enabling "hot
corner" feature,
but in some cases the feature will not take effect after a computer
is restarted.
Solution
It
seems that unityshell plugin is rewritting the expo plugin
configuration. Configure the expo plugin to be loaded after
unityshell:
1) Start gconf-editor and find /apps/compiz-1/general/screen0/options/active_plugins key
2) Double-click on the key active_plugins will display edit window
3) Place expo under unityshelland click OK to save the changes
12-Ctrl+Alt+Backspace doesn't work
Issue
Ctrl+Alt+Backspace
doesn't restart/kill X server and session.
Solution
This
feature needs to be enabled:
System Settings... > Keyboard Layout > Options... > Key Sequence to kill X Server > Select option Ctrl+Alt+Backspace
13-Touchpad stop working
Issue
Touch-pad
can randomly stop working sometimes on laptops/net books/notebooks.
Solution
Disable
touch-pad and re-enable it again using shortcut Fn
+ F7.
14-Ubuntu Netbook Restart Problem
Many
Linux users that have netbooks have been complaining about restart
issue. I didn't pay attention to the complaints until I bought Acer
Aspire One D257 netbook
Namely,
the netbook running Ubuntu 11.10 and Ubuntu 12.04 failed to reboot,
it ended up in a black screen and can only shutdown. What was very
strange the issue existed only on regular restart procedure: System
button in upper right corner > Shut down... > Restart button.
If restart was peformed after system udpate it could reboot properly.
The
reason for the problem could be a BIOS issue or the hardware setup of
the system. For example some netbooks with Atom processor doesn't
come with a keyboard controller in which case Linux kernel can't
figure out the way to tackle that situation.
If
you have simillar problem with your netbook failing to reboot, here
is the way to solve it:
1) Open terminal
1) Open terminal
2)
Type:
sudo gedit /etc/default/grub
3)
Find GRUB_CMDLINE_LINUX="" and
change it to GRUB_CMDLINE_LINUX=”reboot=
4)
Save changes and close gedit
5)
Update the grub with the following command:
sudo update-grub
6)
Power off your machine and then switch it on again. Once it is
booted, try to restart it to see whether it is working. If this is
not working, try following commands instead of efi (i.e.:
reboot=efi).
warm =
Don’t set the cold reboot flagcold =
Set the cold reboot flagbios =
Reboot by jumping through the BIOS (only for X86_32)smp =
Reboot by executing reset on BSP or other CPU (only for
X86_32)triple =
Force a triple fault (init)kbd =
Use the keyboard controller. cold reset (default)acpi =
Use the RESET_REG in the FADTefi =
Use efi reset_system runtime servicepci =
Use the so-called “PCI reset register”, CF9force =
Avoid anything that could hang.
Depending
on netbook's manufacturer and model, bios, acpi, pci, efi seems to be
probable solutions.
Here
are some solutions for a couple of netbook models:
- Acer Aspire One D257 netbook - efi will fix the issue
- Acer Aspire One Happy 2 netbook - acpi will fix the issue
- Dell latitude E6420 - pci will fix the issue
15-How
to migrate Thunderbird profile
We
at INFORBIRO
- information technology agency as
Free Software advocates use Thunderbird as our mail client. It is
very robust, has great capabilities, supports many different email
accounts and it's easy to migrate between different environments!
Our
developers, designers and consultants often need to use more than one
computer (desktops, laptops, netbooks...) and it is a priority for
them to have mail access from all machines. So I am sure that the
instructions will be very useful to you as well.
In
short, migration a Thunderbird profle is a copying of the profile
folder from one environment to another and editing profiles.ini file.
For
example, here are steps for migrating a Mozilla Thunderbird profile
from Windows 7 to Ubuntu 11.10:
1)
Thunderbird is already default mail client in Ubuntu 11.10 so you do
not need to install it manually
2)
Close Thunderbirds if they are started on both environment
3)
In Ubuntu go to a thunderbird profile folder,
e.g.\home\%user_name%\.
If
you can't see .thunderbird folder it means that is hidden, so
press Ctrl+H to
show all files and folders.
4)
Delete all files from profile folder (make a backup of the folder
first!)
5)
Open profiles.ini file
in a text editor
6)
Check if there is a line with your profile folder name,
e.g. Path=etw22loq.default.
If it contains other path replace it with a valid one.
Example
of profiles.ini in
GNOME on Ubuntu environment:
[General]
StartWithLastProfile=1
[Profile0]
Name=default
IsRelative=1
Path=etw22loq.default
Default=1
7)
Go to a profile folder in Windows 7, e.g. %drive%:\Users\%user
name%\AppData\Roaming\
If
you can't see AppData folder that means it is hidden. To show hidden
files and folders in Windows Explorer: Organize
> Folder and search options > View > Show hidden files,
folders and drives
8)
Copy all files from the Windows 7 profile folder into the profile
folder in Ubuntu
9)
Start Thunderbird and you should be able to see all migrated email
accounts from Windows 7 on Ubuntu.
Note:
If
you need to migrate an Thunderbird profile from Linux to Windows
consider that on Windows 7 fileprofiles.ini is
located in %drive%:\Users\%user
name%\AppData\Roaming\
Happy
emailing!
16-"Ubuntu 12.04 has experienced an internal error" message
Ubuntu
12.04 contains error reporting system named Apport that can send
error information to Ubuntu center in case that something goes wrong
on your system. Debugging program crashes without any automated tools
has been pretty time consuming and hard for both developers and
users, so that is the main reason why this system exists.
There
are many reported issues caused with various reasons displaying the
message error:
Sorry, Ubuntu 12.04 has experienced an internal error
If
you experience something simillar you can click on "Show
Details..." button to see what data it collected. On my system
(Acer Aspire One D257 Netbook) this is the issue that used to appear
very often:
Sorry Ubuntu 12.04 has experienced an internal error.
If you notice further problems, try restarting the computer.
...
ExecutablePath
/usr/lib/unity-lens/music/unity-music-daemon
Package
unit-lens-music 5.10.0-0ubuntu1
ProblemType
Crash
Title
Unity-music-daemon crashed with SIGSEGV in g_bit_lock()
ApportVersion
2.0.1-0ubuntu7
Architecture
...
17-How to disable Apport error-reporting system in Ubuntu
However,
you can disable the error-reporting system following the steps:
1)
Run the command
sudo gedit /etc/default/apport
2)
Change the value of the "enabled" parameter from "1"
to "0"
3)
Save changes
18-Ubuntu 12.04 - Unity Launcher Hiding Behind Other Windows
Unity
Launcher is an application switcher and launcher in Ubuntu Unity.
In
some cases, it goes in the background, behind all windows and the
Unity Shell, and it's not possible to move it to the frontend, in
front all other windows (what is its default and normal behaviour).
This happens no matter whether you enabled Unity Launcher auto hide
option or not.
I
noticed that in the most cases GIMP causes this annoying Unity
Launcher's behavior. After some further use, the computer could
freeze for a brief moment and Unity Launcher and Dash could continue
to work properly in front of windows and dash.
After
rebooting, the issue dissapears until the next time (there is no rule
for this bug)
19-How to bring Unity Launcher back to front without
restarting the computer and destroying the session
Here
are the steps how to restart unity launcher without destroying the
session and avoiding restarting
1) Start terminal
2) Enter the following command:
sudo unity&disown
3) Hit Enter button
Screen
will flick a few times and after that everything will be back again.
Consider
that the above steps is not the real bug's solution but rather a way
to temporarily fix its outcome.
20-Ubuntu 12.04 - How to Change Default Font
Unity,
a default desktop shell in newer Ubuntu releases doesn't have an
option for changing default font type and size as Ubuntu had in the
previous versions.
Somehow,
I think that default font size in Ubuntu 12.04 Precise Pangolin is
too big for modern screen resolutions. Here are instructions how to
change default font size in Ubuntu:
1)
Instal gnome tweak tool with the command:
sudo apt-get install gnome-tweak-tool
2)
Start gnome tweak tool either by click on Dash Home and entering
"advanced settings" or typing command "gnome-tweak-tool"
in the terminal
3)
GNOME Tweak Tool window will appear4) Select the Fonts section on the
left5) Choose your preferent default font, document, monospace and
window title font as well as font size and hinting and antialiasing
types.
21-Ubuntu 12.04 - Wireless Password Remember
Default
behaviour in Ubuntu 12.04 fir wireless conectivity is to ask a user
for a password every time the system is started displaying message
"Wireless
Connection Authentication Required".
Also, if you have a weak wireless signal it could happen that Ubuntu
has problems to connect and continue asking for password.
Here
is the tutorial how to force Ubuntu to remember wireless connection
password and to connect automatically without asking you every time.
1) Click on the connection icon on the taskbar
2) Select the last menu item "Edit Connections..."
3) Click on the Wireless tab
4) Select you connection and click the Edit button
5) New window will appear
6) Check "Connect automatically" checkbox
7) Click "Wireless Security" tab
8) Select the connection's Security (usually it is "WEP 40/128-bit Key (Hex or ASCII)")
9) Enter your password in the Key field. You can check the "Show key" checkbox if you want to see what password you entered
10) Click "Save..." button
22-Ubuntu 12.04 - How to Enable Hibernate
Ubuntu
12.04 doesn't have enabled hibernate feature by default, but you can
enable it if your hardware has support for hibernation.
Before
you turn on the hibernate option in Ubuntu 12.04 Precise Pangolin you
need to be sure that you machine supports hibernate without any
issues. Please consider that hibernate feature on unsupported devices
could make a lot of problems even losing your data. You're warned!
23-How to check if computer supports hibernate in Ubuntu 12.04
To
be sure that your computer can hibernate open the terminal and enter
the command:
sudo pm-hibernate
Enter
your password when prompted.
After
you computer turns off, switch it back on. If all windows appear as
they were before restarting and the system continues to work you can
consider enabling hibernate.
In
case that hibernate doesn't work properly be sure that swap partition
is at least as large as available RAM.
24-How to enable hibernate in Ubuntu 12.04 Precise Pangolin
1)
Create file
/etc/polkit-1/localauthority/50-local.d/com.ubuntu.desktop. pkla
2)
Add the following content
[Re-enable hibernate by default]
Identity=unix-user:*
Action=org.freedesktop.upower.hibernate
ResultActive=yes
3)
Save the file
4)
Restart machine
5)
You should see new menu item that will allow Ubuntu hibernation
25-Ubuntu
12.04 - "Hot Corner" Stop Working
We
wrote how
to show desktop in Ubuntu 12.04 by
enabling "hot corner" feature.
In
some cases this setting will not take effect after a computer is
restarted. It seems that unityshell plugin is rewritting the expo
plugin configuratin so this could cause the issue.
You
could work around the issue by setting expo plugin to be loaded after
unityshell:
1) Start gconf-editor
2) Find /apps/compiz-1/general/screen0/options/active_plugins key
3) Double-click on the key active_plugins will display edit window
4) Place expo under unityshell
26-Ubuntu
- Delete Apt Cache
Ubuntu
is based on Debian GNU/Linux distribution, thus it uses Apt package
manager.
Default
behavior is to keep downloaded software packages on the file system
during installation process. During time the packages can use a lot
of disk space and we suggest occasionall cache cleaning.
How to clear Apt cache
1)
Run file manager (e.g. Nautilus) as root user
2)
Navitage to /var/cache/apt/archives
3)
Delete all .deb installation
package files
Note:
Be sure not to delete folder partial and
file lock.
27-Ubuntu
12.04 - Frozen Touchpad
Ubuntu
12.04 is the latest and long term support (LTS) Ubuntu release.
It
works really great (although with some issues),
and I use it for business purpose as well as on home laptop/netbook.
Occasionally, I experience a problem with touchpad on my netbook.
Namelly, touchpad stops responding and mouse cursor can't be moved on
screen.
I'm
not sure what causes the issue with touchpad freezing, but the
solution that works in my case is very simple - disable and re-enable
touchpad support.
1) Press Fn (function key) + F7 in order to disable frozen touchpad
Information that the touchpad is disabled will be displayed.
2) Press again Fn (function key) + F7 to re-enable the touchpad
Now
you should be able to use the touchpad without any issue. If the
touchpad freez again, replay mentioned steps.
28-Ubuntu
12.04 - Change Mouse Cursor Size
Some
readers of our knowledgebase (we prefer this term over blog),
complained about mouse pointer size in Ubuntu 12.04 Precise
Pangolin.
It
seems that in some cases the size of the pointer is quite a bit
larger than it should be (about twice as large as "normal"
size), although the different cursors (editing text, hyperlink hand,
etc) has correct size. The size changes to the correct size when the
pointer is over some application windows (Netbeans, Firefox), but
then changes back once it is moved out of the window.
If
you experience this issue, you could update the cursor theme ans size
to resolve the problem. There are a couple of ways to do this.
First method to change pointer size in Ubuntu
1)
Open terminal
2)
Enter the following command
sudo
update-alternatives --config x-cursor-theme
3)
Choose the number of the theme you want (for example, 0 for
DMZ-White)
Note:
After you change the value, you need to reboot computer (logout and
login will not work)
Second method to change Ubuntu cursor size
Also,
you can change the cursor's size with dconf-editor.
1)
If dconf-editor is not installed on your machine, install it with:
sudo
apt-get install dconf-tools
2)
Go to org.gnome.desktop.interface
3)
Change the cursor size to 24 and cursor theme to DMZ-White
After
these changes mouse pointer size should be with proper size in Ubuntu
12.04.
29-Ubuntu
12.04 - Update Could Not Get Lock Error
I
experienced the problem with my Ubuntu 12.04 installation a couple of
days ago related to the updating process. The error message was:
Could not get lock /var/lib/apt/lists/lock - open (11: Resource temporarily unavailable)
If
you have the same problem here are the steps that could solve the
issue
Method
1
Restart
the system and try again
Method
2
If
restarting doesn't help, try refreshing package source list
Method
3
Run
the following commands
sudo rm /var/lib/apt/lists/* -vf
sudo apt-get update
Method
4
Try
with the following command
sudo apt-get update && sudo apt-get upgrade
Method
5
If
neither of the steps mentioned above don't work, check if the
update process is already running, kill it and try again
30-Problems
with LibreOffice icons in Ubuntu 12.04
There
are several issues with LibreOffice icons in Ubuntu 12.04:
- icons are not displayed at all
- icons are duplicated
- white square is displayed instead real icons and it is not responsive
- a grey empty area are displayed instead the icon
- LibreOffice programs are not listed in opened applications and they are not visible even if you use Alt + Tab
So,
when you run, for example the Calc, the icon is sometimes the icon is
present in the launcher, but there is an empty space on the launcher
just above the Calc icon or icon is invisible. This bug is a
cosmetical one however in a LTS distribution this does not look
professional
Users
that use KDE can experience the issue icons not showing in the Office
menu.
Possible solution(s)
The
only solution we found in GNOME is to lock the icons to the launcher.
After that number of the issue will be lower, but they could still
appear.
If
you cannot see running LibreOffice application even
with Alt
+ Tab, you
can use a workaround - Super
key + W will
show all open windows. Super key is usually the Windows button.
Currently,
problem in KDE environment can be solved by using the LibreOffice
ppa-repository:
# sudo add-apt-repository ppa:libreoffice/ppa
# sudo apt-get update
# sudo apt-get upgrade
31- Clear and Disable Bash History
Descended
from the Bourne Shell, Bash is a GNU product, the "Bourne Again
SHell." It's the standard command line interface on most Linux
machines. It excels at interactivity, supporting command line
editing, completion, and recall.
Bash
stores commands entered on the command line and provide access to
those stored commands so that they can be used again with relative
ease.
That
is Bash's history/recall function in a nutshell. You just press the
up arrow to scroll back through your command history. See the command
you want and press Enter/Return to execute it again.
However,
maybe you want to change this behavior and disable Bash history.
How to clear and disable Bash history
Use
the following Bash builtin history command:
history -c
In
order to stop the writing of your Bash history to a file when you log
out, run the command:
unset HISTFILE
32-How to Fix an Ubuntu Error:(initramfs)

First Solution:-
1. Boot from the Ubuntu Live CD;
2. Open/Run Terminal;
3. Type: sudo fdisk -l (to get the device name) then press ENTER;
Disk /dev/sda: 250.1 GB, 250059350016 bytes
255 heads, 63 sectors/track, 30401 cylinders
Units = cylinders of 16065 * 512 = 8225280 bytes
Disk identifier: **********
255 heads, 63 sectors/track, 30401 cylinders
Units = cylinders of 16065 * 512 = 8225280 bytes
Disk identifier: **********
Device Boot Start End Blocks Id System
/dev/sda1 * 1 30238 242886703+ 83 Linux
/dev/sda2 30239 30401 1309297+ 5 Extended
/dev/sda5 30239 30401 1309266 82 Linux swap / Solaris
/dev/sda1 * 1 30238 242886703+ 83 Linux
/dev/sda2 30239 30401 1309297+ 5 Extended
/dev/sda5 30239 30401 1309266 82 Linux swap / Solaris
The device name for my friend’s system based on the above: /dev/sda1
4. Type: sudo fsck /dev/sda1 then press ENTER;
5. Restart the system and boot normally.
* The laptop booted normally after the fix.
or..
Second Best Solution...
1. Boot from the Ubuntu Live CD;
2. Open/Run Terminal;
# fdisk -l | grep Linux | grep -Ev 'swap'
# dumpe2fs /dev/sda2 | grep superblock
# fsck -b 32768 /dev/sda2
33-Keyboard / Mouse and Browser Problem Solution...
>>>>Ubuntu 12.04LTS stuck at login mouse and keyboard not responding-
Ans- This is a
x11 problem.Switch to a virtual console (Alt+F2) and login as your
normal user. Now delete the .config .gconf and .compiz-1 folders from
your home directory.
$rm -rvf . .config/ .gconf/ .compiz-1/
$sudo apt-get update
Then System Reboot and check..
>>>>Mozilla problem--
Ans- Switch to a virtual console (Alt+F2) and login as your normal user. Now delete the..
$rm -rvf .mozilla/firefox/*
then..
$sudo apt-get update
check..
>>>>Google chrome problem--
Ans- Switch to a virtual console (Alt+F2) and login as your normal user. Now delete the..
Ans- Switch to a virtual console (Alt+F2) and login as your normal user. Now delete the..
$rm -rvf .config/google-chrome/*
$sudo apt-get update
check..
Enjoy.....
34. Ubuntu 13.04 or 12.04 – How To Get Rid Of “System Program Problem Detected” error

If you report the problem nothing happens and it dosen’t really show the cause of the error
The error keeps on popping up again and again. It is irritating.
To stop the error from popping up follow these steps:
[Note:These steps don't actually solve the problem but just stop the error from popping up!]
1.Open a terminal
2. Enter the following code
3.In the file
gedit/etc/default/apportChange the enabled from 1 to 0. 4.This will stop the error from pooping up. Enjoy!
35. Turn Off Error Reporting in Ubuntu 12.04 (Precise Pangolin)
This feature is added to Ubuntu by default and is there to help Ubuntu gather information about issues and create a fix for them. It’s recommended that you don’t disable it as it helps Ubuntu develop better software.
Even though you’re advised not to turn it off, that option is there when you need it. This brief tutorial is going to show you how to disable the error reporting feature of Ubuntu when you need to.
Objectives:
- Disable the error reporting feature in Ubuntu
- Enjoy!
sudo gedit /etc/default/apport

Finally, change the value to 0 to disable it. 1 to Enable it if it’s disabled and save the file.

Enjoy!

Please share if you like it on:
35.How to Disable Apport Error Reporting in Ubuntu

First launch a terminal window from the dash home (or Ctrl+Alt+T).

Paste following command into terminal and hit enter to edit /etc/default/apport file:
gksu gedit /etc/default/apport
Set enable=1 to enable=0 to disable error apport.

That’s it!
36. How to fix error "The system is running in low-graphics mode" ?

Few days back I faced this error while installing other desktop environment on my PC. The error was "The system is running in low-graphics mode"
So now I decided to share this tip with you guys, If you face any problem in your Ubuntu or Linux Mint or Ubuntu based Distro. This is common bug of Lightdm.


First enter this commands:
So now I decided to share this tip with you guys, If you face any problem in your Ubuntu or Linux Mint or Ubuntu based Distro. This is common bug of Lightdm.
First enter this commands:
sudo apt-get install --reinstall unity-greeter
sudo dpkg-reconfigure lightdm
sudo nano /etc/lightdm/lightdm.conf
greeter-session=unity-greeter
or
greeter-session=ubuntu
Getting started:
Below is the image of the error you’ll get when your package system is broken.

To fix it, go to System –> Administration –> Synaptic Package Manager.

Then select ‘Custom Filters’ on the left menu.

Next select ‘Broken’ on the left and you’ll then notice package(s) with the red exclamation marks.

Right-click each package and select ‘Mark for Complete Removal’.

Then click ‘Apply’ to apply the change. When prompted again, click ‘Apply’ to remove them.

Enjoy!

Thanks for reading and please come back soon.
38. grub rescue >
Panic! On my dual boot pc, a failed linux upgrade had wiped the linux boot partion.
The Windows partitions is still there, but unbootable: the boot process was struck at a grub error

error: no such partition.
grub rescue >
The MRB had to be rewritten but I had no Windows install CD ready at hand.
By chance, I had a GParted Live CD in the desk drawer.
I've booted it and luckily it had the ms-sys command on board: ms-sys just rewrites a Windows MBR on the HD.
# ms-sys -m /dev/hda
Reboot.
Windows was back up and running.
39- (Solved) No such Partition Grub Rescue Ubuntu Error

1- Solution-
- To solve it you need to have a working windows 7 DVD To Fix boot and mbr of windows 7.
- If you are ready then Insert working windows 7 DVD to your laptop or desktop 's CD-DVD Rom and boot your system to window 7 installing panel.
- Now click on Repair Link that showing left hand side like following picture.
- Now choose Command prompt option. and write Following two Command to Command write panel.

bootrec /fixmbr
bootrec /fixboot
- Once it say Successful then restart your Computer
Getting Boot-Repair

1st option : get a CD including Boot-Repair
The easiest way to use Boot-Repair is to burn one of the following disks and boot on it.
- Boot-Repair-Disk is a CD starting Boot-Repair automatically.
- Boot-Repair is also included in Linux-Secure-Remix.
Remark : you can also install the ISO on a live-USB
2nd option : install Boot-Repair in Ubuntu
- boot your computer on a Ubuntu live-CD or live-USB.
- choose "Try Ubuntu"
- connect to the Internet
- open a new Terminal, then type:
sudo add-apt-repository ppa:yannubuntu/boot-repair && sudo apt-get update
- Press ENTER.
- Then type:
sudo apt-get install -y boot-repair && (boot-repair &)
- Press ENTER
40- yum Error..
Error...

Today I met an error when I tried running yum commands (like .. yum
list, yum install * , yum clean all, yum update, etc) on RHEL-6.0
linux, the error message looked like below:
[root@server ~]# yum list
[root@server ~]# yum list
Error...
------------------------------
------------------------------
[root@server ~]#
To resolve this issue, we need install ldap and libldap manually ..(can not install it by yum now cause it’s not working):
1- Go to Yum 'Pacakges' Directory..[root@server ~]#
To resolve this issue, we need install ldap and libldap manually ..(can not install it by yum now cause it’s not working):
[root@server ~]# cd /var/ftp/pub/rhel-6/Packages
2- Install 'libdbi*' Package
[root@server Packages]# rpm -ivh libdbi-0.9.10-23.el6.i686.rpm
3- Now Download 'compat-openldap' and then install..
[root@server Packages]# wget 'mirror.centos.org/centos/6/
[root@server Packages]# rpm -ivh compat-openldap-2.3.43-2.el6.
[root@server Packages]# wget 'mirror.centos.org/centos/6/
[root@server Packages]# rpm -ivh compat-openldap-2.3.43-2.el6.
4- Install Openldap Package..
[root@server Packages]# rpm -ivh openldap-2.4.23-26.el6.i686.
[root@server Packages]# rpm -ivh openldap-servers-2.4.23-26.
[root@server Packages]# rpm -ivh openldap-servers-2.4.23-26.
5- Check.....
[root@server Packages]# cd -
[root@server ~ ]# yum list
After the installation of these packages, yum commands worked ok.....
[root@server Packages]# cd -
[root@server ~ ]# yum list
After the installation of these packages, yum commands worked ok.....
# apt-get remove libreoffice
# add-apt-repository ppa:libreoffice/libreoffice-4-
# apt-get update
# apt-get install libreoffice
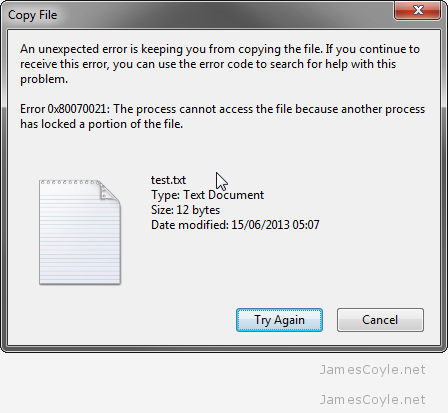
42- How To Fix..?
Samba: The process cannot access the file because another process has locked a portion of the file
I had a problem with a SMB share which was sharing storage from an NFS mount.
Whilst you could argue that it is not efficient to share storage this way, sometimes there is a valid need.
The error was displayed when creating a none empty file, or copying a non zero byte file to the storage. The error is displayed, in my case in Windows, in a dialogue box.
Error:
The process cannot access the file because another process has locked a portion of the file
# vi /etc/samba/smb.conf
----------------------------------------------------------------------------------
When strict locking is disabled, the NFS server will only
lock the file when the client tells it to. When it is enabled, the NFS
server locks the file on every read and write.
[global]
netbios name = sambaserver
workgroup = JAMESCOYLE
security = user
encrypt passwords = yes
strict locking = no
[homes]
comment = %u's Home Directory
browsable = no
read only = no
1. Change Root User
sudo -i
# OR ##su -
2. Install Adobe YUM Repository RPM package
## Adobe Repository 32-bit x86 ##
rpm -ivh http://linuxdownload.adobe.com/adobe-release/adobe-release-i386-1.0-1.noarch.rpm
rpm --import /etc/pki/rpm-gpg/RPM-GPG-KEY-adobe-linux

## Adobe Repository 64-bit x86_64 ##
rpm -ivh http://linuxdownload.adobe.com/adobe-release/adobe-release-x86_64-1.0-1.noarch.rpm
rpm --import /etc/pki/rpm-gpg/RPM-GPG-KEY-adobe-linux
yum check-update
Fedora 19/18/17/16/15/14/13/12, CentOS 6 and Red Hat (RHEL) 6 32-bit and 64-bit version
yum install flash-plugin nspluginwrapper alsa-plugins-pulseaudio libcurl
|
4b. Install Adobe Flash Player 11.2 on CentOS 5.10 and Red Hat (RHEL) 5.10
CentOS and Red Hat 32-bit and 64-bit version
"Sound and Video"

yum install flash-plugin nspluginwrapper curl
yum groupinstall
|
Adobe Flash Player 64-bit on Firefox 26, installed on Fedora 20 64-bit (x86_64)

CentOS 5.8 and Red Hat 5.8

Then open following page for real testing Adobe Flash Plugin:
Then How to Fix This Error ?
Ans.- Check The Below Image..