The Preboot Execution Environment (PXE) is an industry standard client/server interface that
allows networked computers that are not yet loaded with an operating system to be configured and booted remotely
by an administrator. The PXE code is typically delivered with a new computer on a read-only
memory chip or boot disk that allows the computer (a client)
to communicate with the network server so that the
client machine can be remotely configured and its operating system can be remotely booted.

Step 1: First Set the static IP address
# vim /etc/sysconfig/network-scripts/ifcfg-eth0
BOOTPROTO=static
IPADDR=192.168.0.1
NETMASK=255.255.255.0
DNS=192.168.0.1
:wq (save and exit)
Step-2 Insert the RHEL 6 dvd into DVD ROM and Mount in'/media'
# mount /dev/cdrom /media
Step-3 Create 'yum' server
Note-If you don't know how to configure 'yum' Server,Please Click this
Link-http://ashutoshlinuxnotes.blogspot.in/p/10.html
or
# cd /media/Packages
# rpm -ivh vsftpd* -y # Install 'vsftpd' package
# mkdir /var/ftp/pub/rhel-6 #-->Create a Directory
# chmod -R 777 /var/ftp/pub/ #-->Change Directory Permission
#-->Copy all '/media'data in this location '/var/ftp/pub/rhel-6/
# cp -rvf . /media/* /var/fip/pub/rhel-6/
# cd /etc/yum.repos.d/
# vim yum.repo
[yum-server]
name=ashutosh
baseurl=file:///var/ftp/pub/rhel-6/
gpgcheck=0
:wq
# umount /media #--> Umount '/media'
# yum clean all #--> Clear all cache memory
# service vsftpd restart #--> restart vsftpd service
# chkconfig vsftpd on
# yum list
Yun Server Configuration has been finished..
Step-4 Now install syslinux, xinetd, tftp-server, dhcp, system-config-kickstart, nfs-utils, using yum
# yum install syslinux dhcp tftp-server system-config-kickstart nfs-utils -y
Step-5 Configure DHCP Server
Note-If you don't know how to configure 'dhcp' Server,Please Click this
Link- http://ashutoshlinuxnotes.blogspot.in/p/25_7.html
or
# cp /usr/share/doc/dhcp-4.1.1/dhcpd.conf.sample /etc/dhcp/dhcpd.conf
Now Edit dhcpd.conf file according to your network
# vim /etc/dhcp/dhcpd.conf
----------------------------------------------------------
Allow booting;
Allow bootp;
authoritative;
# This is the very basic subnet declaration.
subnet 192.168.0.0 netmask 255.255.255.0 {
range 192.168.0.1 192.168.0.50;
option domain-name "server.com";
option domain-name-servers 192.168.0.1;
default-lease-time 21600;
max-lease-time 43200;
next-server 192.168.0.1;
filename *pxelinux.0*;
}
:wq!
------------------------------------------------------------------
# service dhcpd restart
# chkconfig dhcpd on
DHCP Server Configuration has been finished.
Step-6 Configure TFTP Server
# vim /etc/xinetd.d/tftp
disable = no
:wq
# cp -rvf /var/ftp/pub/rhel-6/isolinux/* /var/lib/tftboot/
# mkdir /var/lib/tftboot/pxelinux.cfg
# cp /var/lib/tftboot/isolinux.cfg /var/lib/tftboot/pxelinux.cfg/default
# cp /usr/share/syslinux/pxelinux.0 /var/lib/tftpboot/
# service xinetd restart
# chkconfig xinetd on
Step-7 Disable Firewall
# system-config-firewall
Step-8 Create kickstart file
1- Download Kickstart File-
Click This LInk- https://drive.google.com/file/d/0B6a_xo57qqI9VXE2VEhzcjVadGM/edit?usp=sharing
2- Open 'system-config-kickstart'
# system-config-kickstart
Note- How to Configure kickstart file---Read

Click File Menu--> Click Opn File--> (Define your Download File path)--> Select file ks.cfg--> Click open

Basic Configuration-
Root Password-: Enter the desired root password for the system in the Root Password text entry box.
Target Architecture-: Choosing Target Architecture specifies which specific hardware architecture distribution is used during installation.

Installation Method-
The Installation Method screen allows you to choose whether to perform a new installation or an upgrade. If you choose upgrade, the Partition Information and Package Selection options are disabled. They are not supported for kickstart upgrades.

Boot Loader Option-

Partition Information-To create a partition, click the button.

Network Configuration-

Authentication-

Firewall Configuration-

Display Configuration-

Pacakge Selection-

Pre-Installation Script-

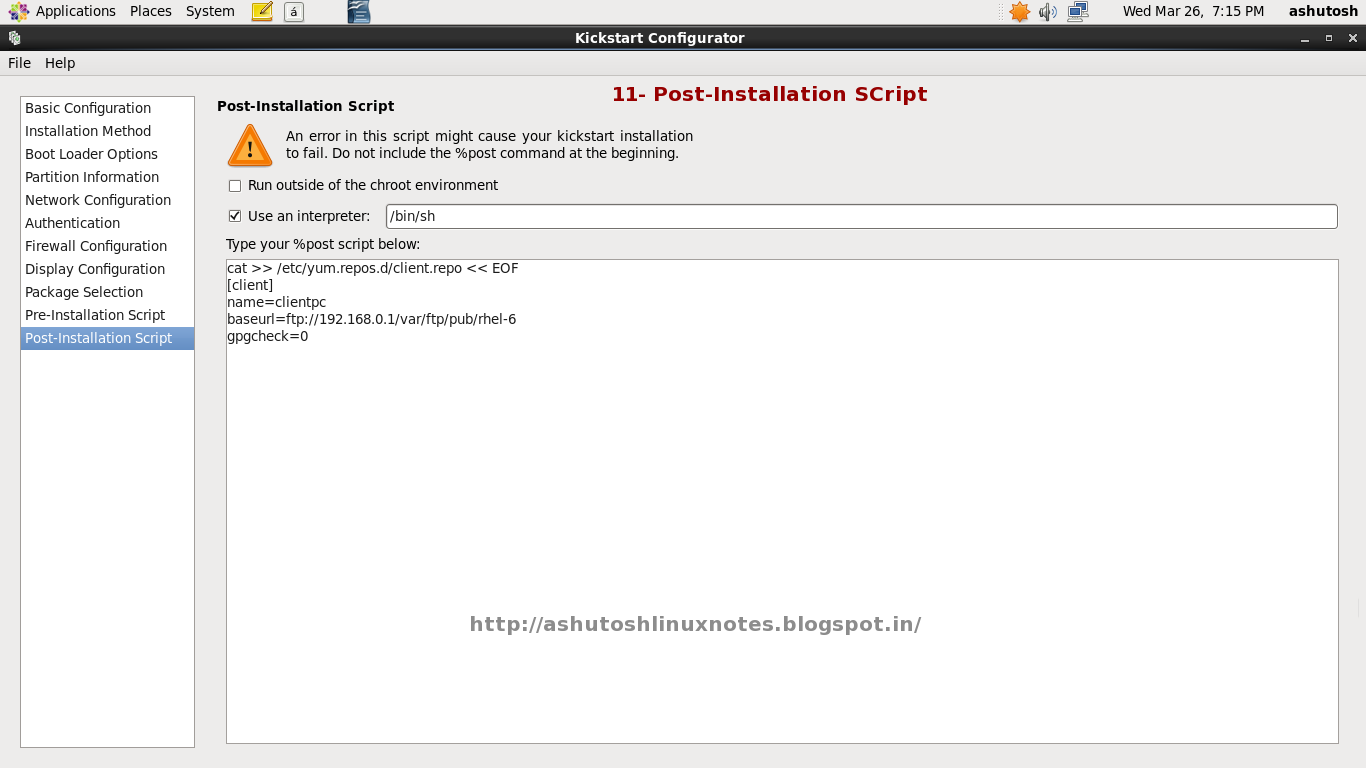
Post Installatio script-
Note- Type this script (This script automatic create yum repo in client pc)
cat >> /etc/yum.repos.d/client.repo << EOF
[client]
name=clientpc
baseurl=ftp://192.168.0.1/var/ftp/pyb/rhel-6
gpgcheck=0
Now Click File Menu--> Click Save and save to /var/ftp/pub/rhel-6 --->File name- ks.cfg
Check this file 'ks.cfg'
# ll /var/ftp/pub/rhel-6
# vim /var/lib/tftboot/pxelinux.cfg/default
Entry- ks=ftp://10.0.0.1/pub/rhel-6/ks.cfg
-------------------------------------------------------------------------------------------------------------------
default vesamenu.c32
#prompt 1
timeout 600
display boot.msg
menu background splash.jpg
menu title Welcome to Red Hat Enterprise Linux 6.1!
menu color border 0 #ffffffff #00000000
menu color sel 7 #ffffffff #ff000000
menu color title 0 #ffffffff #00000000
menu color tabmsg 0 #ffffffff #00000000
menu color unsel 0 #ffffffff #00000000
menu color hotsel 0 #ff000000 #ffffffff
menu color hotkey 7 #ffffffff #ff000000
menu color scrollbar 0 #ffffffff #00000000
label linux
menu label ^Install or upgrade an existing system
menu default
kernel vmlinuz
append initrd=initrd.img linux ks=ftp://192.168.0.1/pub/rhel-6/ks.cfg
label vesa
menu label Install system with ^basic video driver
kernel vmlinuz
append initrd=initrd.img xdriver=vesa nomodeset
label rescue
menu label ^Kickstart installation system
kernel vmlinuz
append initrd=initrd.img
label local
menu label Boot from ^local drive
localboot 0xffff
:wq
-------------------------------------------------------------------------------------------------------------------
Reatart all Services-
# service vsftpd restart
# service dhcpd restart
# service xinetd restart
PXE Server Configuration has been Completed.
Now On Client PC and Boot Pxe Server....

_____________________________________________________________________________________________

Step 1: First Set the static IP address
# vim /etc/sysconfig/network-scripts/ifcfg-eth0
BOOTPROTO=static
IPADDR=192.168.0.1
NETMASK=255.255.255.0
DNS=192.168.0.1
:wq (save and exit)
Step-2 Insert the RHEL 6 dvd into DVD ROM and Mount in'/media'
# mount /dev/cdrom /media
Step-3 Create 'yum' server
Note-If you don't know how to configure 'yum' Server,Please Click this
Link-http://ashutoshlinuxnotes.blogspot.in/p/10.html
or
# cd /media/Packages
# rpm -ivh vsftpd* -y # Install 'vsftpd' package
# mkdir /var/ftp/pub/rhel-6 #-->Create a Directory
# chmod -R 777 /var/ftp/pub/ #-->Change Directory Permission
#-->Copy all '/media'data in this location '/var/ftp/pub/rhel-6/
# cp -rvf . /media/* /var/fip/pub/rhel-6/
# cd /etc/yum.repos.d/
# vim yum.repo
[yum-server]
name=ashutosh
baseurl=file:///var/ftp/pub/rhel-6/
gpgcheck=0
:wq
# umount /media #--> Umount '/media'
# yum clean all #--> Clear all cache memory
# service vsftpd restart #--> restart vsftpd service
# chkconfig vsftpd on
# yum list
Yun Server Configuration has been finished..
Step-4 Now install syslinux, xinetd, tftp-server, dhcp, system-config-kickstart, nfs-utils, using yum
# yum install syslinux dhcp tftp-server system-config-kickstart nfs-utils -y
Step-5 Configure DHCP Server
Note-If you don't know how to configure 'dhcp' Server,Please Click this
Link- http://ashutoshlinuxnotes.blogspot.in/p/25_7.html
or
# cp /usr/share/doc/dhcp-4.1.1/dhcpd.conf.sample /etc/dhcp/dhcpd.conf
Now Edit dhcpd.conf file according to your network
# vim /etc/dhcp/dhcpd.conf
----------------------------------------------------------
Allow booting;
Allow bootp;
authoritative;
# This is the very basic subnet declaration.
subnet 192.168.0.0 netmask 255.255.255.0 {
range 192.168.0.1 192.168.0.50;
option domain-name "server.com";
option domain-name-servers 192.168.0.1;
default-lease-time 21600;
max-lease-time 43200;
next-server 192.168.0.1;
filename *pxelinux.0*;
}
:wq!
------------------------------------------------------------------
# service dhcpd restart
# chkconfig dhcpd on
DHCP Server Configuration has been finished.
Step-6 Configure TFTP Server
# vim /etc/xinetd.d/tftp
disable = no
:wq
# cp -rvf /var/ftp/pub/rhel-6/isolinux/* /var/lib/tftboot/
# mkdir /var/lib/tftboot/pxelinux.cfg
# cp /var/lib/tftboot/isolinux.cfg /var/lib/tftboot/pxelinux.cfg/default
# cp /usr/share/syslinux/pxelinux.0 /var/lib/tftpboot/
# service xinetd restart
# chkconfig xinetd on
Step-7 Disable Firewall
# system-config-firewall
Step-8 Create kickstart file
1- Download Kickstart File-
Click This LInk- https://drive.google.com/file/d/0B6a_xo57qqI9VXE2VEhzcjVadGM/edit?usp=sharing
2- Open 'system-config-kickstart'
# system-config-kickstart
Note- How to Configure kickstart file---Read
Click File Menu--> Click Opn File--> (Define your Download File path)--> Select file ks.cfg--> Click open
Basic Configuration-
Default Language-: Choose the language to use during the installation and as the default language to be used after installation from the menu.
Keyboard-: Select the system keyboard type from the menu.
Time Zone-: From the menu, choose the time zone to use for the system. To configure the system to use UTC, select Use UTC clock.
Root Password-: Enter the desired root password for the system in the Root Password text entry box.
Target Architecture-: Choosing Target Architecture specifies which specific hardware architecture distribution is used during installation.
Installation Method-
The Installation Method screen allows you to choose whether to perform a new installation or an upgrade. If you choose upgrade, the Partition Information and Package Selection options are disabled. They are not supported for kickstart upgrades.
Boot Loader Option-
Partition Information-To create a partition, click the button.
Network Configuration-
Authentication-
Firewall Configuration-
Display Configuration-
Pacakge Selection-
The Package Selection window allows you to choose which package groups to install.
Package resolution is carried out automatically.
Pre-Installation Script-
Post Installatio script-
Note- Type this script (This script automatic create yum repo in client pc)
cat >> /etc/yum.repos.d/client.repo << EOF
[client]
name=clientpc
baseurl=ftp://192.168.0.1/var/ftp/pyb/rhel-6
gpgcheck=0
Now Click File Menu--> Click Save and save to /var/ftp/pub/rhel-6 --->File name- ks.cfg
Check this file 'ks.cfg'
# ll /var/ftp/pub/rhel-6
# vim /var/lib/tftboot/pxelinux.cfg/default
Entry- ks=ftp://10.0.0.1/pub/rhel-6/ks.cfg
-------------------------------------------------------------------------------------------------------------------
default vesamenu.c32
#prompt 1
timeout 600
display boot.msg
menu background splash.jpg
menu title Welcome to Red Hat Enterprise Linux 6.1!
menu color border 0 #ffffffff #00000000
menu color sel 7 #ffffffff #ff000000
menu color title 0 #ffffffff #00000000
menu color tabmsg 0 #ffffffff #00000000
menu color unsel 0 #ffffffff #00000000
menu color hotsel 0 #ff000000 #ffffffff
menu color hotkey 7 #ffffffff #ff000000
menu color scrollbar 0 #ffffffff #00000000
label linux
menu label ^Install or upgrade an existing system
menu default
kernel vmlinuz
append initrd=initrd.img linux ks=ftp://192.168.0.1/pub/rhel-6/ks.cfg
label vesa
menu label Install system with ^basic video driver
kernel vmlinuz
append initrd=initrd.img xdriver=vesa nomodeset
label rescue
menu label ^Kickstart installation system
kernel vmlinuz
append initrd=initrd.img
label local
menu label Boot from ^local drive
localboot 0xffff
:wq
-------------------------------------------------------------------------------------------------------------------
Reatart all Services-
# service vsftpd restart
# service dhcpd restart
# service xinetd restart
PXE Server Configuration has been Completed.
Now On Client PC and Boot Pxe Server....
_____________________________________________________________________________________________
Click Back.. Click Home..